Tabs with fragments look better . In case of several screens I prefer adding tabs. I am going to describe the whole process of adding tabs in android.
Step 1 : Add the following dependency in the moduleable build.gradle file.
Step 2 : Now come to the material design part. Open up your styles.xml and add the followings :
Step 3 : We'll create two xml file. One for toolbar & the other one for tablayout. So create tool_bar.xml & add the toolbar.
Step 4 : Now open activity_main.xml. There we gonna add those toolbar & tablayout. Parent layout will be a CoordinatorLayout. First we gonna add a AppBarLayout which will hold the toolbar & tab layout. Below the AppBarLayout, we gonna add a ViewPager. This viewpager contains the fragments which we gonna add later. Also an adapter is needed for this viewpager. We gonna include toolbar & tablayout using "include" tag inside AppbarLayout. The activity_main.xml will look like this :
Step 5 : Now we need an adapter for viewpager. Create a class ViewPagerAdapter and add the followings :
Now open up MainActivity.java and create variable for ToolBar, TabLayout & ViewPager. Initialize them. We have written a method setUpViewPager for adding fragments with viewpager.
 That's all.
Source Code
continue reading Android Tab Layout
Step 1 : Add the following dependency in the moduleable build.gradle file.
compile 'com.android.support:design:23.1.1'
Step 2 : Now come to the material design part. Open up your styles.xml and add the followings :
    <style name="MyMaterialTheme" parent="MyMaterialTheme.Base">

    </style>

    <style name="MyMaterialTheme.Base" parent="Theme.AppCompat.Light.DarkActionBar">
        <item name="windowNoTitle">true</item>
        <item name="windowActionBar">false</item>
        <item name="colorPrimary">@color/colorPrimary</item>
        <item name="colorPrimaryDark">@color/colorPrimaryDark</item>
        <item name="colorAccent">@color/colorAccent</item>
    </style>
You can customize your preferred color in colors.xml. After this , dont forget to edit the manifest file. Add MyMaterialtheme as theme there.Step 3 : We'll create two xml file. One for toolbar & the other one for tablayout. So create tool_bar.xml & add the toolbar.
<?xml version="1.0" encoding="utf-8"?>
<LinearLayout xmlns:android="http://schemas.android.com/apk/res/android"
    xmlns:app="http://schemas.android.com/apk/res-auto"
    android:orientation="vertical"
    android:layout_width="match_parent"
    android:layout_height="match_parent">

    <android.support.v7.widget.Toolbar
        android:id="@+id/toolBar"
        android:layout_width="match_parent"
        android:layout_height="?attr/actionBarSize"
        android:background="?attr/colorPrimary"
        app:layout_scrollFlags="scroll|enterAlways"
        app:popupTheme="@style/ThemeOverlay.AppCompat.Light">

    </android.support.v7.widget.Toolbar>

</LinearLayout>
Create tab_layout.xml & add the followings :<?xml version="1.0" encoding="utf-8"?>
<LinearLayout xmlns:android="http://schemas.android.com/apk/res/android"
xmlns:app="http://schemas.android.com/apk/res-auto"
android:orientation="vertical"
android:layout_width="match_parent"
android:layout_height="match_parent">
<android.support.design.widget.TabLayout
android:id="@+id/tablayout"
android:layout_width="match_parent"
android:layout_height="wrap_content"
app:tabMode="fixed"
app:tabGravity="fill">
</android.support.design.widget.TabLayout>
</LinearLayout>
We'll include these two xml files as per our need. Here tabMode = fixed means we can't swipe the tablayout. Of course, we can make it swipeable or horizontally scrollable (whatever it is) !!Step 4 : Now open activity_main.xml. There we gonna add those toolbar & tablayout. Parent layout will be a CoordinatorLayout. First we gonna add a AppBarLayout which will hold the toolbar & tab layout. Below the AppBarLayout, we gonna add a ViewPager. This viewpager contains the fragments which we gonna add later. Also an adapter is needed for this viewpager. We gonna include toolbar & tablayout using "include" tag inside AppbarLayout. The activity_main.xml will look like this :
<?xml version="1.0" encoding="utf-8"?>
<android.support.design.widget.CoordinatorLayout xmlns:android="http://schemas.android.com/apk/res/android"
    xmlns:app="http://schemas.android.com/apk/res-auto"
    xmlns:tools="http://schemas.android.com/tools"
    android:layout_width="match_parent"
    android:layout_height="match_parent"
    tools:context="com.example.newaj.tablayout.MainActivity">

    <android.support.design.widget.AppBarLayout
        android:layout_width="match_parent"
        android:layout_height="wrap_content"
        android:theme="@style/ThemeOverlay.AppCompat.Dark.ActionBar">

        <include layout="@layout/tool_bar"></include>
        <include layout="@layout/tab_layout"></include>


    </android.support.design.widget.AppBarLayout>

    <android.support.v4.view.ViewPager
        android:layout_width="match_parent"
        android:layout_height="match_parent"
        android:id="@+id/viewpager"
        app:layout_behavior="@string/appbar_scrolling_view_behavior">

    </android.support.v4.view.ViewPager>


</android.support.design.widget.CoordinatorLayout>
Now our xml part is completed.Step 5 : Now we need an adapter for viewpager. Create a class ViewPagerAdapter and add the followings :
public class ViewPagerAdapter extends FragmentPagerAdapter {

    private List<Fragment> fragments = new ArrayList<>();
    private List<String> titles = new ArrayList<>();

    public ViewPagerAdapter(FragmentManager fm) {
        super(fm);
    }

    @Override
    public Fragment getItem(int position) {
        return fragments.get(position);
    }

    @Override
    public int getCount() {
        return fragments.size();
    }

    public void addFragment(Fragment fragment, String title) {
        fragments.add(fragment);
        titles.add(title);
    }

    // this method is responsible for displaying tab title
    @Override
    public CharSequence getPageTitle(int position) {
        return titles.get(position);
    }
}
Step 6 : Now create some fragments. We have to set the fragment layout inside oncreateView method. Initialization inside fragment should be done inside onActivityCreated method.Now open up MainActivity.java and create variable for ToolBar, TabLayout & ViewPager. Initialize them. We have written a method setUpViewPager for adding fragments with viewpager.
public void setUpViewPager(ViewPager viewPager) {
        ViewPagerAdapter viewPagerAdapter = new ViewPagerAdapter(getSupportFragmentManager());
        viewPagerAdapter.addFragment(new FragmentOne(), "One");
        viewPagerAdapter.addFragment(new FragmentTwo(), "Two");
        viewPagerAdapter.addFragment(new FragmentThree(), "Three");
        viewPagerAdapter.addFragment(new FragmentFour(), "Four");

        viewPager.setAdapter(viewPagerAdapter);
}
Task is almost done.We have to call setSupportActionBar() method after initializing toolbar. Now call the setUpViewPager() method and pass the initiated viewpager object. Finally add tablayout with the viewpager. Additionally you can add icons with tabs. You have to keep those icons inside drawable folder. Note that - if you use normal fragment, then use getFragmentManager(). I am using v4 fragment. So I have called getSupportFragmentManager() method. MainActivity.java code is given below :public class MainActivity extends AppCompatActivity {
private Toolbar toolbar;
private TabLayout tabLayout;
private ViewPager viewPager;
private int[] icons = {R.drawable.one, R.drawable.two, R.drawable.three, R.drawable.four};
@Override
protected void onCreate(Bundle savedInstanceState) {
super.onCreate(savedInstanceState);
setContentView(R.layout.activity_main);
toolbar = (Toolbar) findViewById(R.id.toolBar);
setSupportActionBar(toolbar);
viewPager = (ViewPager) findViewById(R.id.viewpager);
setUpViewPager(viewPager);
tabLayout = (TabLayout) findViewById(R.id.tablayout);
tabLayout.setupWithViewPager(viewPager);
setUpTabIcons(tabLayout, icons);
}
public void setUpViewPager(ViewPager viewPager) {
ViewPagerAdapter viewPagerAdapter = new ViewPagerAdapter(getSupportFragmentManager());
viewPagerAdapter.addFragment(new FragmentOne(), "One");
viewPagerAdapter.addFragment(new FragmentTwo(), "Two");
viewPagerAdapter.addFragment(new FragmentThree(), "Three");
viewPagerAdapter.addFragment(new FragmentFour(), "Four");
viewPager.setAdapter(viewPagerAdapter);
}
public void setUpTabIcons(TabLayout tabLayout, int[] icons) {
tabLayout.getTabAt(0).setIcon(icons[0]);
tabLayout.getTabAt(1).setIcon(icons[1]);
tabLayout.getTabAt(2).setIcon(icons[2]);
tabLayout.getTabAt(3).setIcon(icons[3]);
}
}
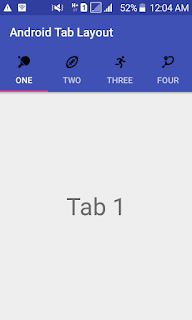
Final output : 
Source Code